# Elden Ring — All Bosses Guide
IGN-Standard Complete Walkthrough | Updated 2026-07-27
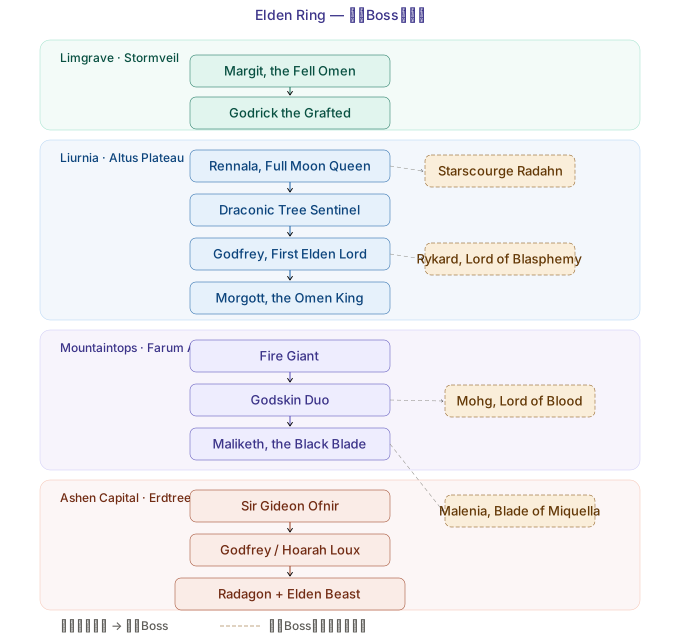
# Quick Reference
| Boss | Area | Mand. | Rec. Lv | Difficulty | Weakness | Core Strategy |
|---|---|---|---|---|---|---|
| Margit | Stormveil Gate | ✅ | 20-25 | ★★★★ | Bleed/Parry | Summon Rogier + Lone Wolves |
| Godrick | Stormveil Top | ✅ | 30-35 | ★★★ | Slash | Hit hands from behind, duck fire |
| Red Wolf | Raya Lucaria | ✅ | 38-42 | ★★★ | Low poise | Heavy jump attacks |
| Rennala | Raya Lucaria Lib. | ✅ | 40-45 | ★★★ | Physical | P1 hit glowing girls, P2 melee rush |
| Drac. Tree Sentinel | Leyndell Gate | ✅ | 60-65 | ★★★★ | Bleed | Horseback circling |
| Godfrey (Shade) | Leyndell | ✅ | 70-75 | ★★★★ | Slash | Dodge → counter |
| Morgott | Leyndell Throne | ✅ | 75-80 | ★★★★ | Bleed | Shackle + bleed build |
| Fire Giant | Mountaintops | ✅ | 85-90 | ★★★★ | Slash | Horseback ankle attacks |
| Godskin Duo | Farum Azula | ✅ | 95-100 | ★★★★★ | Sleep | Sleep pots, one at a time |
| Maliketh | Farum Azula | ✅ | 100-105 | ★★★★★ | — | Blasphemous Claw parry |
| Gideon Ofnir | Ashen Capital | ✅ | 100-105 | ★★★ | Physical | Rush him while he talks |
| Godfrey/Hoarah Loux | Ashen Capital | ✅ | 105-110 | ★★★★★ | Bleed/Lightning | P2 ultra-aggressive |
| Radagon + Elden Beast | Erdtree | ✅ | 110-120 | ★★★★★ | Fire/Physical | Radagon weak to fire, Beast to physical |
| Starscourge Radahn | Redmane Castle | ❌ | 55-60 | ★★★★★ | Scarlet Rot | 6 NPC summons + horseback |
| Mohg, Lord of Blood | Mohgwyn Palace | ❌ | 90-100 | ★★★★ | Bleed | Purifying Crystal Tear |
| Malenia | Haligtree Roots | ❌ | 120-130 | ★★★★★★ | Bleed/Frost | Mimic Tear + Waterfowl dodge |
# Chapter 1: Early Game (Limgrave → Stormveil → Raya Lucaria)
# ① Margit, the Fell Omen
Quick Info
- Location: Stormveil Castle gate
- Mandatory/Optional: ✅ Mandatory
- Recommended Level: 20 ~ 25
- Weapon Upgrade: +2 ~ +3
- Effective Damage: Slash / Bleed
- NPC Summon: Rogier (gold sign right of fog gate)
- Spirit Ash: Lone Wolf Ashes
- Reward: Talisman Pouch (+1 slot)
- Runes: 12,000
# Attack Pattern Breakdown
| Attack | Trigger | Counter | Danger |
|---|---|---|---|
| Light Blade 2-Hit | Mid-range | Roll backward ×2 | ★★ |
| Light Blade 3-Hit | Close range | Roll→Roll→Roll backward | ★★★ |
| Holy Daggers | Long range | Sidestep | ★ |
| Leap Hammer Slam | P2 below 50% | 2 sec recovery → DPS window | ★★★ |
| Hammer 3-Hit Combo | P2 mid-range | Left roll→Right roll→Roll forward | ★★★★ |
| Tail Sweep | Behind him | Immediate roll | ★★ |
| Charge Thrust | Extreme range | Side roll, not back | ★★ |
# Phase-by-Phase
Phase 1 (100% ~ 55%) — Foundation
- Summon Rogier + Lone Wolves immediately
- Let Rogier tank, attack from the side
- Use a bleed weapon (Bloodhound's Fang / Reduvia / Uchigatana+Bloody Slash)
- The final hit of light blade combos always requires a backward roll
Phase 2 (55% ~ 0%) — Hammer Phase
- Signature: leaps up, golden hammer slam
- After leap slam, wait before attacking — check for follow-up
- Maintain mid-range, bait the 3-hammer combo, punish after the 3rd slam
- Priority: re-summon if NPC/spirits die
💡 Newbie trap: Don't get greedy! This boss teaches you "turn-based combat" — he attacks, you attack. No more than 2-3 hits per window.
# ② Godrick the Grafted
Quick Info
- Location: Stormveil Castle summit
- Mandatory/Optional: ✅ Mandatory
- Recommended Level: 30 ~ 35
- Weapon Upgrade: +4 ~ +5
- Effective Damage: Slash
- NPC Summon: Nepheli Loux (gold sign before fog)
- Spirit Ash: Lone Wolves / Rotten Stray
- Reward: Godrick's Great Rune + Remembrance of the Grafted
- Runes: 20,000
# Attack Pattern Breakdown
| Attack | Counter | Danger |
|---|---|---|
| Axe Sweep | Roll forward through → get behind | ★★ |
| Storm Combo | Roll left ×3 continuously | ★★★ |
| Earthquake | Jump to avoid | ★★★ |
| Dragon Fire Sweep | P2, duck — flame goes over your head | ★★★★ |
| Dragon Grab | P2, immediate retreat (oneshot potential) | ★★★★★ |
# Phase-by-Phase
Phase 1 (100% ~ 50%) — Storm Axe
- Summon Nepheli immediately
- Core idea: always circle behind, hit the hands
- Every axe sweep leaves a 1.5 sec opening for 2 light attacks
Phase 2 (50% ~ 0%) — Dragon Head Graft
- Free damage during the cutscene transition
- Dragon fire breath → walk right up to his face and crouch — flames go overhead
- Dragon grab is the biggest threat → glow from dragon mouth = roll backward ×2
- Circle-behind strategy still works, watch for tail wind
💡 Key insight: This boss teaches you — getting close is safer than staying far. His wide attacks hit the outer radius, not point-blank.
# ③ Red Wolf of Radagon
- Recommended Level: 38 ~ 42
- Weakness: Very low poise — heavy weapons stagger in 3-4 hits
- Strategy: Jump heavy attacks relentlessly. Magic swords → run, don't roll. Sword-in-mouth charge → side roll (back roll = caught). Chain stagger with charged heavies after ripostes.
# ④ Rennala, Queen of the Full Moon
- Recommended Level: 40 ~ 45
- P1: Hit the 3 glowing golden girls. Ignore unlit ones. After all 3 → Rennala falls → burst DPS for 5-6 sec. Repeat twice.
- P2: Rush her immediately (lock-on teleport closes gap). All spells dodgeable by sidestep/forward roll. Summoned spirits (dogs/giant/dragon) → kill dogs first. Physical damage only — she has extremely high magic resistance.
⚠️ Mage warning: Pure sorcery builds suffer here. Bring a physical sidearm (Moonveil) or use Rock Sling (physical damage spell).
# Chapter 2: Mid-Game Watershed
# ⑤ Starscourge Radahn ※ Optional but recommended
- Recommended Level: 55 ~ 60
- Key: Scarlet Rot (Rotten Breath / Antspur Rapier) trivializes him
- Phase 1 (ranged): Summon NPCs from gold signs across the battlefield. Gravity arrows → sidestep. Arrow rain → gallop sideways.
- Phase 2 (melee): Dual sword sweeps → forward roll. Gravity pull → move away 5m.
- Phase 3 (50% to 0, meteor): MOUNT TORRENT AND GALLOP AT FULL SPEED when he vanishes. After meteor lands → 4-5 sec punish window. Apply Scarlet Rot via breath.
# Chapter 3-5: Late Game — Leyndell → Farum Azula → Ashen Capital
# ⑥ Draconic Tree Sentinel (Lv 60-65)
Horseback circling is safest. Counter-clockwise, hit once after each slam/fire breath. Lightning strike → gallop sideways. Fireballs from horse → sprint diagonally.
# ⑩ Godskin Duo ★ Major Roadblock
Quick Info
- Mandatory/Optional: ✅ Mandatory
- Recommended Level: 95 ~ 100
- Weapon Upgrade: +22 ~ +25
- ‼️ ESSENTIAL: Sleep Pots / St. Trina's Sword
Two bosses share one health bar. Strategy:
- Sleep pot the fat one → 20-30 sec nap
- Fight the skinny one 1v1
- Reapply sleep if it wakes. Use pillars as cover from fireballs.
- Summon Mimic Tear / Black Knife Tiche for aggro split.
# ⑭ Radagon + Elden Beast (Final Boss)
Radagon:
- Weak to Fire (Blasphemous Blade / Flame Grant Me Strength)
- Every hammer slam has a delayed holy AoE → roll twice
- Grab → right hand glows → roll backward immediately
Elden Beast:
- Weak to Physical (Fallingstar Beast Jaw / Black Blade)
- Meteor rain → run sideways
- Gold rings → run out or roll through
- Cosmic backdrop mega-attack → keep running, dodge light pillars
- Wear highest holy defense gear (Haligtree Knight set / Bull-Goat set + Haligdrake Talisman+2)
# Hidden Boss: Malenia, Blade of Miquella ★ ★ ★ ★ ★ ★
Hardest boss in the game. Over 300 million Tarnished killed (official stat).
Fatal Mechanic
Lifesteal: Every hit Malenia lands on you — even blocked hits — heals her. Your spirit summons getting hit also heals her. Tank spirits are counterproductive here.
| Attack | Counter | Danger |
|---|---|---|
| Normal Slashes | Roll backward ×3 or block | ★★ |
| Thrust | Side roll — extremely sudden | ★★★★ |
| Aerial Downslash | Side roll ×2, then punish window | ★★★ |
| Waterfowl Dance | Run away(1)→Roll forward(2)→Roll back(3) | ★★★★★★ |
| Phantom Spirits | P2 only, keep running + final roll | ★★★★★ |
| Scarlet Aeonia | P2 leap slam → run out of AoE | ★★★★ |
Waterfowl Dance detailed dodge:
- She jumps → sprint away immediately
- 1st flurry → roll outward (keep distance)
- 2nd flurry → roll FORWARD through her
- 3rd flurry → roll BACKWARD to escape final petals
Recommended Builds:
- Bleed god: Dual Scavenger's Curved Swords + Seppuku + White Mask + Lord of Blood's Exultation
- Freeze pot: Throw Freezing Pot during Waterfowl startup to proc Frostbite mid-air
- Mimic Tear: Most reliable spirit, but your loadout syncs to the mimic
- Do NOT use Black Knife Tiche — she constantly feeds Malenia lifesteal
# 📋 Pre-Final-Boss Checklist
Before challenging the final boss gauntlet:
- [ ] Weapon upgraded to +25 (standard) or +10 (somber)
- [ ] Flask count: 14 charges (+12)
- [ ] Flask upgrade level: +12
- [ ] Character level at least 110+ (120-130 recommended for final duo)
- [ ] Torrent whistle upgraded (at least 2 seeds activated)
- [ ] Spirit Ash upgraded to +10
- [ ] At least 3 Great Runes collected
- [ ] At least 3 talisman slots (4 recommended)
- [ ] Holy defense talisman equipped (Haligdrake Talisman+2, found in Haligtree)
- [ ] Malenia attempted (optional but recommended)